Digital Passage Plans for Inspection: What an RYA Instructor Likes to See
Why digital passage plans matter now
A decade ago most students turned up with a paper chart, an almanac and a pencil. Today many arrive with a tablet, a phone and a set of apps. The RYA syllabus still expects the same core skills. You plan a safe route, you think about tide and weather, you brief the crew and you keep a lookout. The difference now is how you record and present that thinking.
In this article we look at what an RYA instructor wants to see when you present a digital passage plan on a Day Skipper or Coastal course. We use a simple idea throughout. Decisions for reasons. There is rarely one perfect answer. Your job as skipper is to make clear decisions and to back them up with understandable reasons that tie back to charts, tides, weather and the limits of your crew and boat.
What an instructor actually cares about
During a course or assessment, the focus is not on which app you use. The focus sits on how you think and how you explain that thinking. Instructors tend to look for the same group of things.
If your digital plan helps you show those items clearly, you are on the right track. If the app hides them behind menus or clutter, you will have to work harder to explain yourself.
Core parts of a passage plan, mapped to digital tools
A good passage plan has several parts. Your apps can support each one. The trick is to keep each part simple and easy to show on screen or on paper.
1. Big picture overview
This is your one page summary.
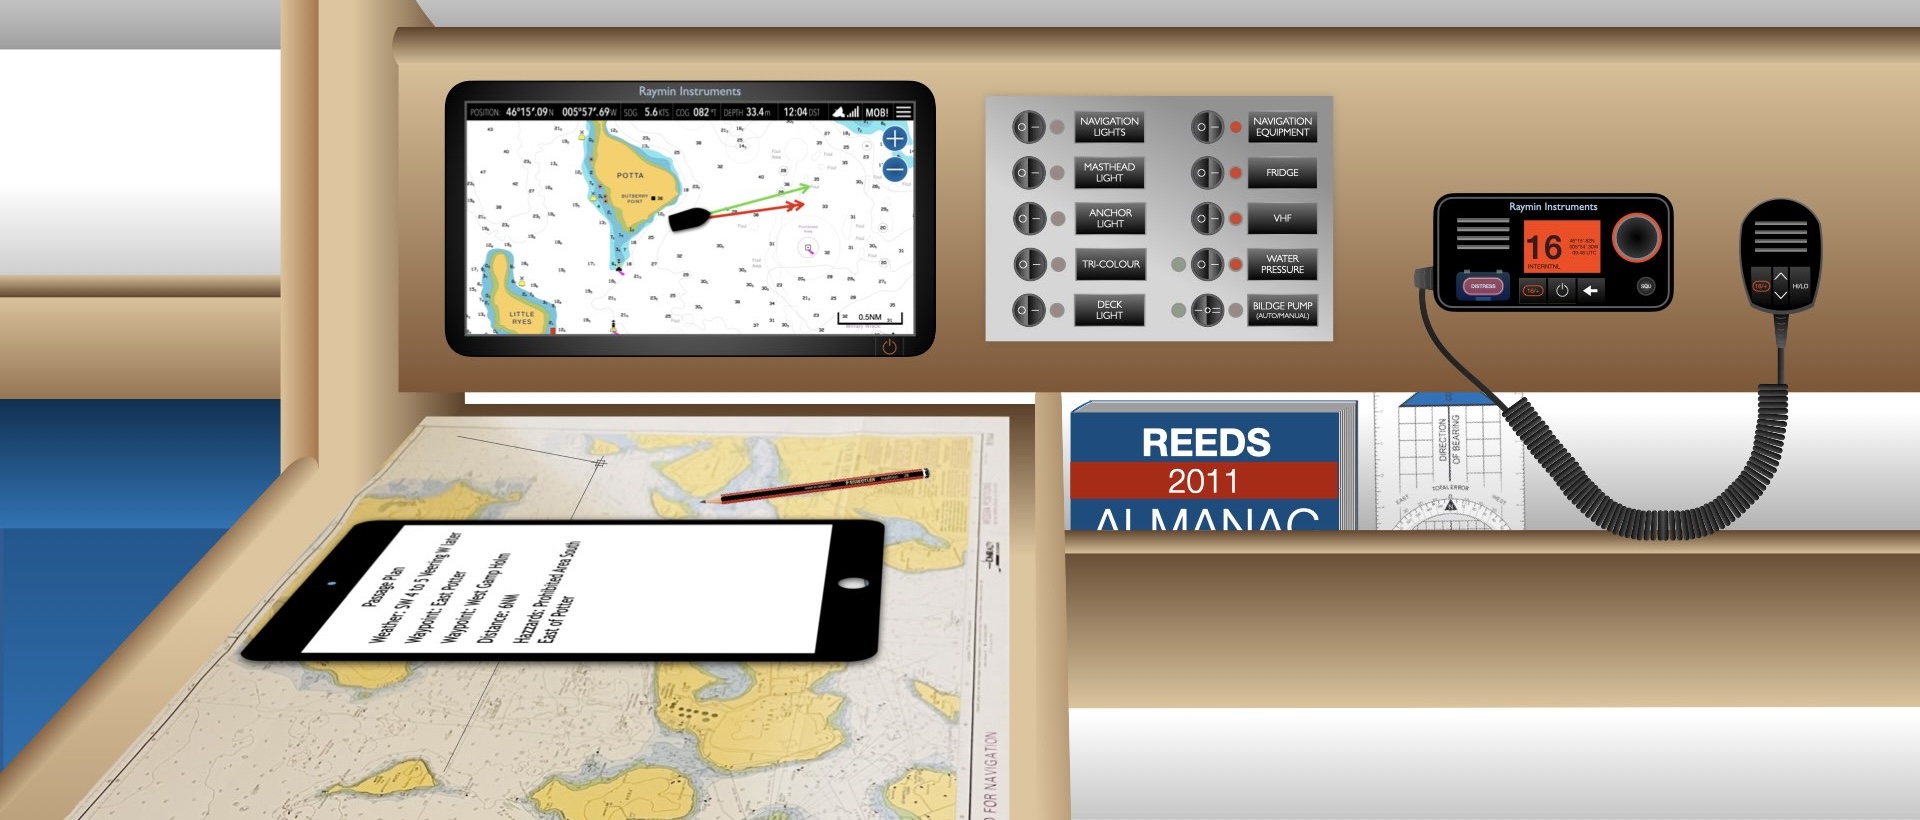
On screen this can be one chart view that shows the whole route. As a document it can be a single PDF page. The instructor should be able to look for ten seconds and say “I see where you are going and roughly how long it will take.”
2. Route and waypoints
Your nav app holds the detailed route. Instructors will look for the following.
Here you can use “Decisions for reasons” in a simple way. For example. “I placed this waypoint here because it keeps us one mile off this headland on a falling tide, and it lines up with this transit.” That short statement shows understanding, not button pressing.
3. Tidal heights
You can calculate heights using an app, an online service or an almanac. The instructor wants to see the numbers laid out clearly.
Digitally this might be a simple table you type into a document, plus a screenshot from your tide app. You can highlight one or two critical times where clearance is tight. Then be ready to explain the choice. “We aim to cross the bar one hour before HW. That gives us 1.8 metres clearance above our draft plus a small extra margin.” That is a decision with a clear reason.
4. Tidal streams
The key here is to show that you understand how streams help or hinder your passage at specific times.
You can mark arrows on a screenshot of the chart with times and rates. You can back this up with a small table. Then you can say. “We leave at this time so the stream carries us north at up to 2 knots. If we are late, we will have adverse stream at this headland so we will divert here instead.” Again. Decision for a reason.
5. Pilotage in and out
Many digital plans look good at passage scale but fall apart in the first and last mile. Instructors pay special attention here.
You can take a screenshot of the harbour, then annotate it in a simple graphics app. List marks by order of use. For example, “On departure we follow this leading line, then steer to this transit across the breakwater. If visibility falls, we hold at this waypoint in safe water.”
6. Weather and sea state
This is where many students fall into the trap of chasing a friendly forecast. The goal is to build a reasoned view instead.
You can keep this to a paragraph or two. For example. “Shipping gives west or southwest 4 to 5, increasing 6 later. Model A agrees. Model B shows 6 by late afternoon. Our limit for this crew is a steady 5 and moderate sea. If the latest update shifts the 6 into our time window, we will delay.” That shows you are not shopping for a forecast that suits your plan. You are assessing confidence and setting rules.
7. Crew, boat and fuel
An instructor likes to see that your plan fits the crew and the boat, not only the tide and weather.
Digitally this might be a simple section at the end of your summary document. The instructor can then ask “Why did you choose this ETA” and you can answer with tide, forecast and crew factors together.
8. Contingencies
This is where “Decisions for reasons” really shows. Your backup plans are still decisions.
On screen this can sit as a short bullet list. In conversation you can explain the logic behind each option. Instructors like to see that you have thought about “what if” in advance.
Provenance and confidence in digital data
Knowing where your data comes from is part of being a modern skipper. Apps make it easy to forget that each number has a source and a date. A good digital plan shows that you have checked both.
Charts
Tides
Weather
When an instructor asks “Why did you trust this number”, you can point to the source and the date, not just the screen.
Building a digital passage plan pack
Think of your plan as a small pack of files.
Suggested contents
Use simple formats. PDF for documents, PNG or JPG for images, GPX for routes. Keep one copy in cloud storage and one offline copy on your device. Add a version date so you and your instructor know which plan is current.
How to present your plan to an instructor
Before the passage
During the briefing
Under way
Common mistakes with digital passage plans
Simple checklist you can reuse
You can print this and keep it at the nav table.