The New Digital-First RYA Approach: What It Means for Students
Digital-first in the RYA context doesn’t mean ditching paper. It means teaching with the tools skippers actually use on the water—chartplotters, navigation apps, AIS and tide overlays—while keeping traditional paper skills as the cross-check and fallback. This article shows how those parts fit together so your planning is tidy and your decisions are calm.
What “digital-first” really means
- Primary tools: electronic charts — plan and monitor on a chartplotter or app, with safety layers (shallow/deep contours, danger alarms) doing useful work for you.
- Real-time awareness — use GNSS (GPS) COG/SOG vectors, tide overlays and (if fitted) AIS target info to predict what happens next, not just record where you’ve been.
- Paper stays important — you’ll still learn charts, EP/DR and CTS by hand. They’re the sanity check when the picture looks odd, and the fallback if power or sensors drop out.
Start with the basics (digital and traditional)
Build a simple foundation, then map it onto the screen:
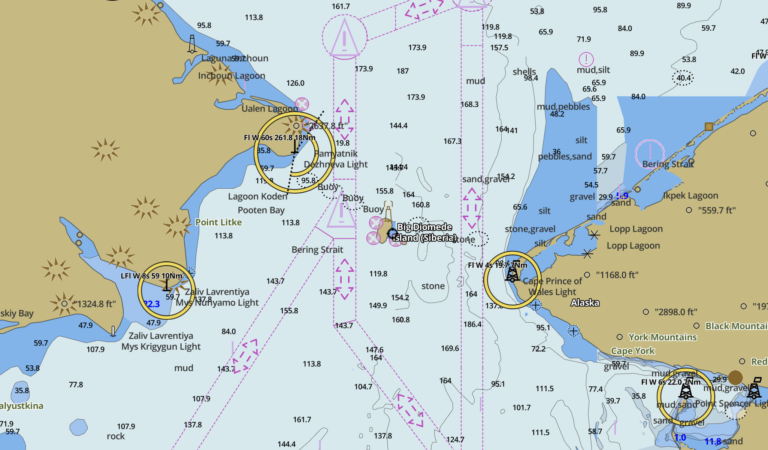
- How to read the map! — chart symbols, depths, contours and sectors. That paper literacy is how you judge any electronic picture.
- Knowing where you are! — visual fixes, waypoints and transits; understand COG/SOG vs. heading and speed through water.
- How much water? — tidal height curves and quick methods; these underpin your “safety depth” settings on the plotter.
- Passage Planning & Making — APEM: Appraise, Plan, Execute, Monitor; the same rhythm you’ll use on screen.
Configuring your plotter/app like a skipper
Set these once, then sail with fewer surprises:
- Datum & units: WGS-84 and metres for UK charts. (If you ever see positions drifting off expected features, check this first.)
- Safety depth / contours: choose a safety contour above your yacht’s draft + margin. Set a shallow alarm and a “deep” contour that helps you spot benign water at a glance.
- Visible margin: colour-shaded shallows (e.g., under 2–5 m) make danger intuitive when you’re busy.
- Alarms that earn their keep: XTE, arrival/approach, anchor drag; if you have AIS, enable CPA/TCPA with sensible thresholds.
- Chart updates: refresh before trips; skim local notices. No system can warn you about an uncharted pot buoy unless a human added it.
- Offline charts: download areas you actually plan to use; test airplane mode at home.
Paper ↔︎ pixels: how to cross-check
Digital-first doesn’t remove paper—it reduces your dependence on it. Use it deliberately:
- Paper as a spot-check: before departures and in approaches, glance at the paper chart for the “big picture”: banks, barred entrances, sectors, overfalls.
- EP/DR when sensors lie: plot a quick EP or DR if the COG/SOG doesn’t match the depth trend or buoy sequence you expect.
- Route sanity: never place waypoints on buoys; pull routes off hazards with visible searoom. Paper helps you spot lazy straight lines across banks.
A digital-first passage workflow (APEM)
- Appraise: open the area on the plotter/app and the paper chart. Read notes, sectors and tide diamonds; check forecast. Mark hazards and the direction of buoyage.
- Plan: build legs well inside safe water. Choose a safety contour that keeps your route pale (safe) not shaded (shallow). Add a pilotage plan for the last mile with a sequence of marks.
- Execute: brief the crew. On the screen, follow the track with XTE visible; on deck, call each mark and light pattern. Adjust for set/drift watching COG vs. intended track.
- Monitor: compare depth trend, SOG changes, and time on leg against plan. If what you see disagrees with the screen, slow down and re-appraise.
Tides in a digital world
Use your app’s tide curves and stream overlays—but understand what they represent so you can sanity-check them:
- Heights: plan go/no-go windows with curves or tables; use your plotter’s safety depth as a backstop, not a decision engine.
- Streams: overlay arrows are helpful, but always cross-check with tide diamonds and what the boat is doing now. If COG is crabbed hard, it’s telling you a story.
Quick practice: plot a hand-drawn EP/DR, then compare it with the app’s predicted track to build intuition.
Downloads that make practice stick
Passage Plan Template
How to plot an Estimated Position
How to plot Dead Reckoning
How to plot a Course to Steer
Redundancy: power, weatherproofing and backups
- Second device: keep a phone or tablet with offline charts and a waterproof pouch as a ready backup.
- Power budget: carry a charged power bank; confirm the helm USB feed isn’t the only lifeline.
- Paper on board: carry the relevant harbour/approach chart even if most work is digital; keep pencils sharp and dividers to hand.
Common digital-first mistakes (and fast fixes)
- Trusting the magenta line: auto-routes can cut corners. Redraw legs to keep generous searoom.
- Datum/units mismatch: fix WGS-84/metres and re-enter any transcribed waypoints.
- Waypoints on marks: never. Give yourself space to think and room to be wrong.
- Ignoring the sky: pair plotter confidence with Weather (Meteorology) so wind-against-tide and visibility don’t surprise you.
How this shows up in RYA progression
- ENS & Day Skipper Theory (online): learn paper methods and how to drive a plotter/app sensibly.
- Competent Crew: use digital pilotage with mark-calling, sectors and visual transits.
- Day Skipper Practical: plan digitally, brief clearly, and cross-check on paper as you go.
- Beyond: add RYA Radar and RYA Marine Radio VHF (SRC) for low-vis and comms confidence.
Enrol when you’re ready
- Start Day Skipper Theory (online)
- Enrol in Essential Navigation & Seamanship (online)
- Join the free Sailing Essentials course
Related RYA courses (overview & providers)
Digital-first navigation reflects how we actually skipper today—screens for speed and clarity, paper for judgement and backup. Learn both, blend them, and enjoy how relaxed your pilotage feels.