Navigating with Waypoints: Maximising Your Chart Plotter’s Potential
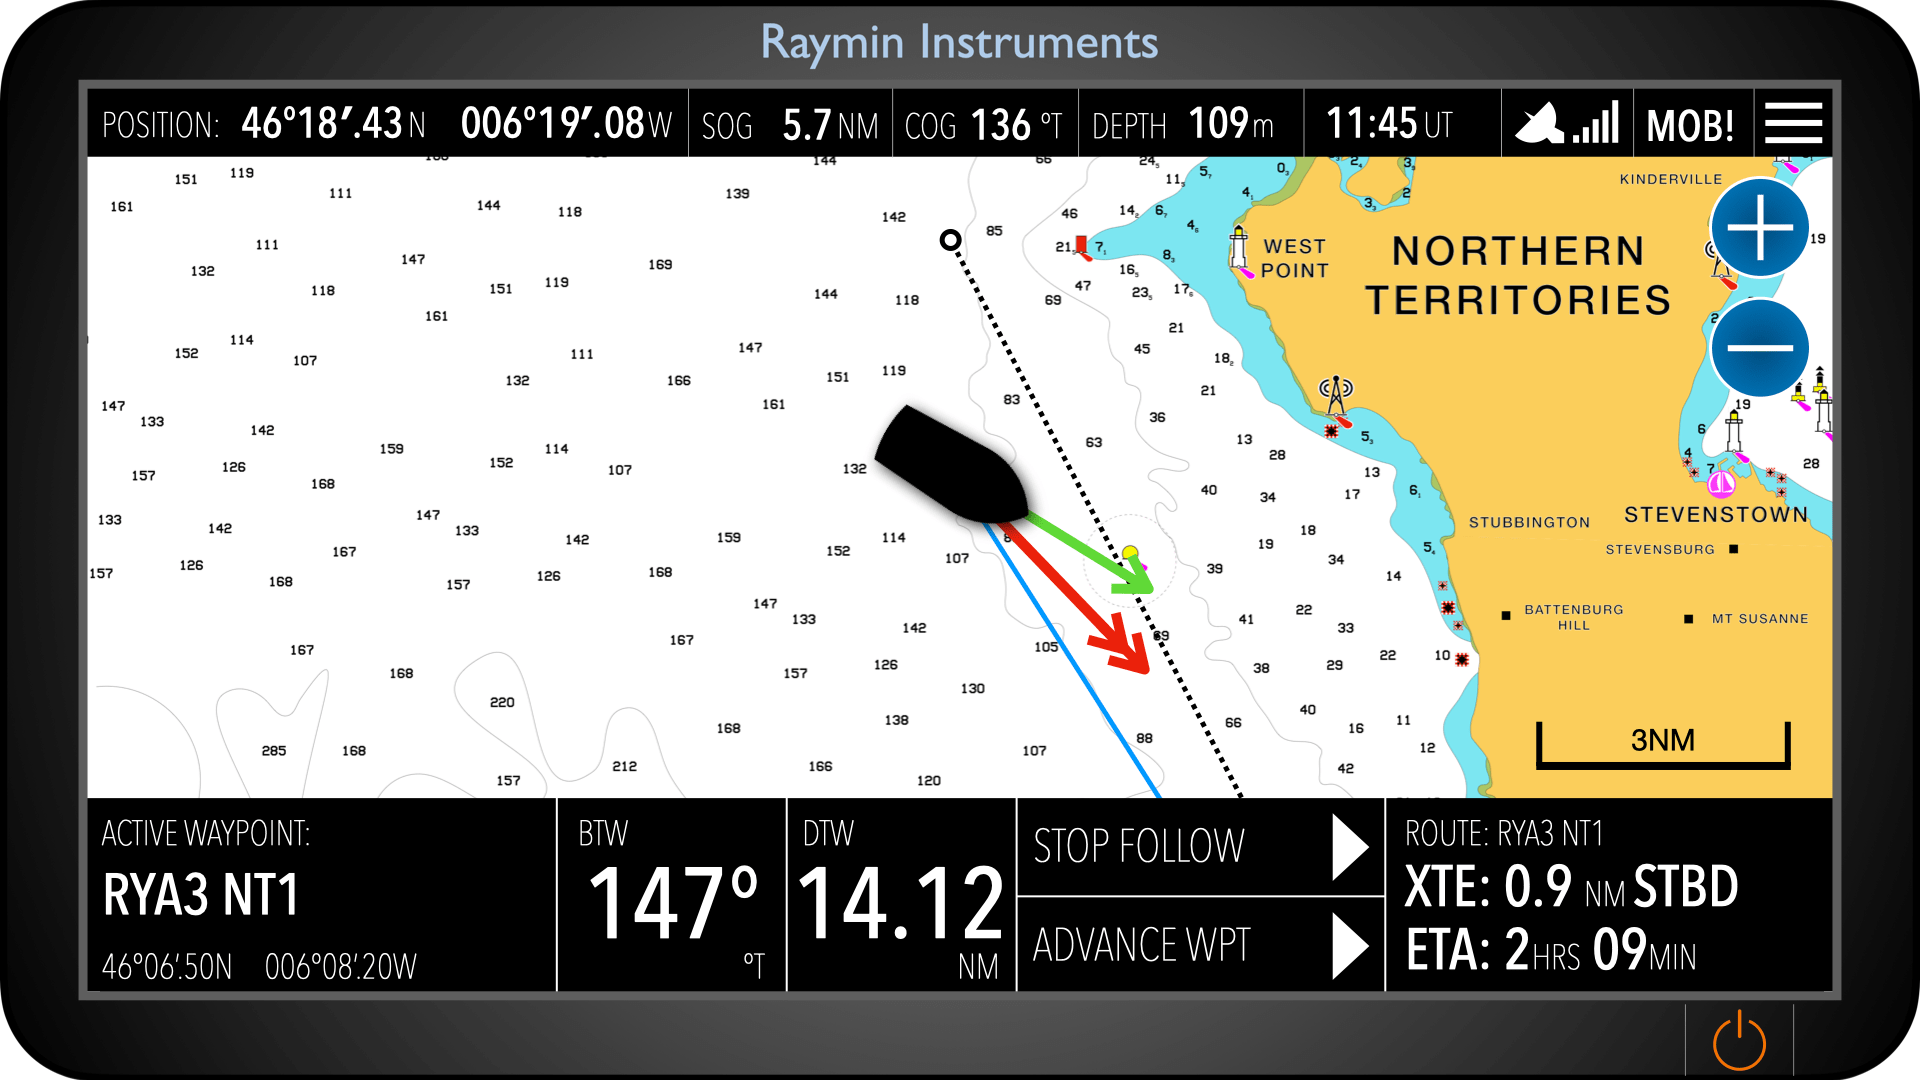
Chart plotters have revolutionised how we navigate, making real-time position tracking, route planning, and decision-making more accessible than ever. Central to this technology are waypoints—specific geographic points you plot on your electronic chart. By linking waypoints together, you can plan a passage and monitor your performance using data like Bearing to Waypoint (BTW), Distance to Waypoint (DTW), and Cross Track Error (XTE).
Some chart plotters also include an autorouting feature, which attempts to generate a suggested route based on safe water, depth contours, and navigational data. While this can be a useful starting point, it’s vital to understand that autorouting is only a suggestion—not a fully safe or complete plan. These routes often assume fair conditions and can overlook hazards, tidal effects, or regulatory zones. Always cross-check autoroutes manually against your chart, tide tables, and local knowledge. For a full walkthrough on safe passage planning, see our companion article on APEM: Appraise, Plan, Execute, Monitor.
But while chart plotters offer powerful tools, they also come with critical limitations. The route shown is always a straight line—the shortest path between two points. It’s essential to remember that the plotter does not evaluate what lies between you and your waypoint. Rocks, shallows, shipping lanes, or restricted areas may all lie directly in your line of travel. This makes passage planning and situational awareness just as important as ever.
What Is a Waypoint?
A waypoint is a fixed point defined by GPS coordinates. You can think of it as a virtual buoy or marker on your electronic chart—one that helps you break your route into manageable legs.
You might set waypoints at:
Instructor Tip: Avoid placing waypoints directly on a buoy or danger mark. Instead, plot them a safe distance away so you have time and space to manoeuvre.
Straight Line Doesn’t Mean Safe Line
When you activate a waypoint, the plotter draws a direct line from your position to that point. This line assumes open, navigable water—but it does not account for obstacles.
Important Reminder: The line from A to B might cross reefs, sandbanks, overfalls, exclusion zones, or busy shipping channels.
Always cross-check your route:
In essence, your plotter is a guide, not a guarantee. It’s up to you to ensure the route is navigable.
Key Navigation Data Fields
Bearing to Waypoint (BTW)
Bearing to Waypoint (BTW) is the compass direction from your current position to the selected waypoint, measured as a straight line over the ground. It represents the shortest path between two points but does not account for navigational hazards, shallow areas, land, or restricted zones between you and the waypoint. While it can suggest a general course to steer, you must always cross-check the route visually and adjust for wind, current, and safe water. Relying solely on the BTW can lead you directly into danger if not used with sound seamanship.
Example: Your current position is off Poole and the next waypoint is south of the Needles. The plotter might show a BTW of 090°—you should steer east. But if that takes you over Shingles Bank, you’ll need to adjust your course to detour safely and then return to track later.
Distance to Waypoint (DTW)
This shows how far away your next waypoint is, usually in nautical miles. It’s helpful for timing decisions, monitoring progress, and estimating arrival.
Example: DTW = 4.2 NM, and your Speed Over Ground (SOG) = 6 knots → Estimated Time to Arrival (ETA) = 42 minutes.
But remember: That’s 4.2 nautical miles as the crow flies—not necessarily the distance you’ll actually travel if you’re avoiding hazards.
Cross Track Error (XTE)
This measures how far you’ve drifted from the direct line between two waypoints—port or starboard. This is especially helpful when you’re being set off course by wind or tide.
Example: You planned a leg across the Solent, but the tide is setting you south. The plotter shows an XTE of 0.2 NM to starboard—you’re off-track to the right. Adjust your course back toward the track, but again, only if the water in that direction is safe.
Creating a Safe Passage Plan
Using your chart plotter effectively means combining its strengths with your own navigation skills. Here’s a simple process for planning and following a safe route:
1. Define Your Destination and Key Points
Mark key locations (harbours, marks, corners) as waypoints.
2. Plot Your Route
Connect waypoints in a sequence that keeps you in safe water.
Don’t just click a line across the screen—check each leg for hazards. You’re responsible for knowing what lies along that line.
3. Adjust for Tide and Conditions
Make sure your legs consider tidal set, streams, and wind.
4. Use the Data While Underway
Practical Example: Studland Bay to Yarmouth
Let’s say you’re sailing from Studland Bay to Yarmouth.
Suggested Waypoints:

If you connect these directly, the line from WPT B to WPT C may run close to overfalls and shallow patches, and the leg to WPT D will be in the main Solent shipping lane. Before accepting the suggested route:
These waypoints would make up part of the Appraise & Plan phases of a Passage Plan. If you’re happy with the plotted route, you’ready to do Execute & Monitor part of a fully formed APEM passage.
Don’t forget, our handy Passage Plan template for helping you gather all the information you need for a safe voyage.
Passage Plan Template
Final Thoughts
Chart plotters are powerful aids—but they are only as smart as the skipper using them. The line to your waypoint is just that—a line. It doesn’t know what’s in the way, and it won’t warn you if you’ve drawn a course through danger.
By understanding how waypoints work, how to interpret your plotter’s data, and how to integrate this with safe passage planning, you’ll be navigating smarter, safer, and with more confidence.
Safe navigation isn’t just about reaching the waypoint—it’s about how you get there.
Want to learn more about chartplotter navigation?
Sign up for a FREE trial to our Day Skipper course and see how we transfomed learning, with a #digitalfirst approach to teaching navigation.
Register for a Free Trial